先扯點提外話吧~XD
最近朋友大推我一本書,書名是"生命咖啡館",裡面問讀者三個神祕的問題:
1.你為什麼在這裡? 2.你害怕死亡嗎? 3.你實現自我了嗎?我想....不少人一看到這三個問題,會跟我有一樣的想法--->
"就醬阿!科科"但也就是會想知道除了"就醬阿"之外,這本書能帶給讀者怎樣的省思~
這本書我也才正要開始看~有心得再寫上來囉!
-----------正題分隔線----------
 1 point = 1 micropolygon
什麼是point cloud(*.ptc)檔勒?顧名思義~裏面存的是point(可用ptviewer開來看看),每個 point 可以有任意的資料,雖然 point 會讓人覺得是一個
點, 但其實在 *.ptc 裏頭,每一個 point 其實是由 (position, normal, area) 三個組成,亦即它是一個有面積的圓盤(disk),所以一個最基本的 .ptc 檔,裏頭的每一個 point 至少會有這三個資料,其餘的就看使用的人怎麼去運用(ex, occlusion, irradiance, …)。
(以上是節錄Drake對point cloud檔的介紹~)
接下來開始介紹如何在RenderMan中使用這種檔案,用的範例也是RMS的document所提供的。
在RenderMan中,要產生*.ptc是透過使用一個叫作
bake3d()的function,在document中的敘述簡述如下:
bake3d(filename, displaychannels, P, N, "radius", r, "coordsystem", cs,
           "interpolate", 0,
           "direct", d, "onebounce", ob, "occlusion", occ, ... );
綠色標記的部份,是要另外寫入*.ptc的channel,也就是除了(position, normal, area)以外,要寫入*.ptc的資訊。而在RIB檔中,也要有一個跟其名稱對應的DisplayChannel。例如:在bake3d中,有一個
"_ooxx", ooxx,其中ooxx為一個type為color的變數,則在RIB中,也要這樣宣告
DisplayChannel "color _ooxx"
才可在*.ptc中寫入一個名為 '_ooxx' 的channel,並將變數color ooxx所存的資訊寫入 '_ooxx'。
至於interpolate這個flag的作用是....先想像有一個四方形的盒子放在桌面上,盒子會有一面跟桌面平貼接觸。當interpolate為0時,除了盒子跟桌子接觸的面的資訊會被寫入*.ptc裡,而桌子跟盒子接觸的面的資訊也會被寫入*.ptc裡;而其值為1時,只會將桌子跟盒子接觸的面的資訊寫入*.ptc裡。所以其值為1是比較省時省空間的。
接下來,來play一下document中的例子吧!
首先,先分別新增一個*.sl和*.rib,這裡檔名分別是ptc_gen.sl與ptc_RIB.rib。先做個小小的實驗~用文字編輯器打開ptc_gen.sl,輸入以下RSL code:
surface
    bake_direct_irrad(string filename = "", displaychannels = "";
                      float interpolate = 1)
    {
        color irrad;
        normal Nn = normalize(N);

        /* Compute direct illumination (ambient and diffuse) */
        //irrad = ambient() + diffuse(Nn);
        irrad = 1;
        /* Store in point cloud file */
        bake3d(filename, displaychannels, P, Nn, "interpolate", interpolate,
               "_ooxx", irrad);

        Ci = irrad * Cs * Os;
        Oi = Os;
    }
注意一下紅色部份:先將 " irrad = ambient() + diffuse() ; " mark起來,另外將irrad的值設為1。
然後打開 ptc_RIB.rib ,輸入:
FrameBegin 0

      Format 400 300 1
      ShadingInterpolation "smooth"
      PixelSamples 4 4

      Display "bake_arealight" "it" "rgba"
      Quantize "rgba" 255 0 255 0.5
   #宣告對應bake3d中的 '_ooxx' channel
      DisplayChannel "color _ooxx"

      Projection "perspective" "fov" 25
      Translate 0 -0.5 8
      Rotate -40  1 0 0
      Rotate 20  0 1 0

      Attribute "trace" "bias" 0.0001

      WorldBegin

        Attribute "cull" "hidden" 0   # don't cull hidden surfaces
        Attribute "cull" "backfacing" 0   # don't cull backfacing surfaces
        Attribute "dice" "rasterorient" 0   # view-independent dicing !
        Attribute "visibility" "int diffuse" 1   # make objects visible to rays
        Attribute "visibility" "int specular" 1   # make objects visible to rays

        LightSource "spherelight" 1 "from" [-2.8 2 0.5] "radius" 0.2
          "intensity" 2 "samples" 64 "falloff" 1

        Sides 1   # to avoid flipping normals in "spherelight"

        # Ground plane
        AttributeBegin
 #產生名稱為area_illum_plane.ptc的point cloud檔
          Surface "bake_direct_irrad" "filename" "area_illum_plane.ptc"
      #將shader中,變數irrad的資訊寫入此*.ptc中
            "displaychannels" "_ooxx"
          Scale 3 3 3
          Polygon "P" [ -1 0 1  1 0 1  1 0 -1  -1 0 -1 ]
        AttributeEnd

        Attribute "visibility" "int transmission" 1 # the cyl. casts shadow
        Attribute "shade" "transmissionhitmode" "primitive"

        # Cylinder with cap
        AttributeBegin
          Surface "bake_direct_irrad" "filename" "area_illum_cyl.ptc"
            "displaychannels" "_ooxx"
          Translate -1 0 0.5
          Rotate -90 1 0 0
          Cylinder 0.5 0 1 360
          Disk 1 0.5 360
        AttributeEnd

      WorldEnd
    FrameEnd
分別用
shader和
prman去編譯ptc_gen.sl和ptc_RIB.rib後,除了可以看到render出來的obj是一片白,還可以在目錄下發現多了兩個ptc檔:
area_illum_plane.ptc
area_illum_cyl.ptc
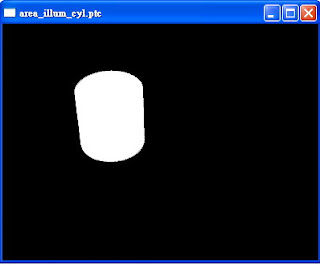
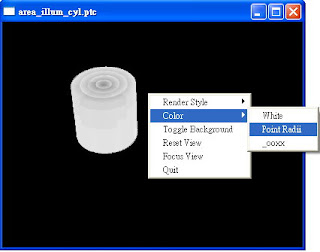
用Pixar RenderMan提供的ptviewer開啟area_illum_cyl.ptc,可以看到如下圖~每個point都是全白的cylinder(因為irrad=1),也就是說~有把irrad是白色的資訊寫入此ptc中:
按右鍵->color可以看到 '_ooxx' 這個channel。選擇Point Radii,可以看到其point的分佈狀況:
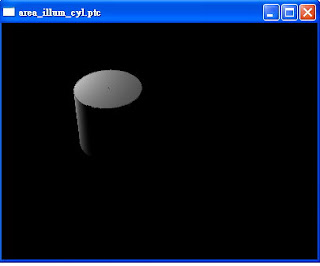
將ptc_gen.sl中的 irrad改回 ' irrad = ambient() + diffuse() ;' 再render則可得到下圖:

其area_illum_cyl.ptc如下圖。用滑鼠左鍵反轉一下,可以看到此cylinder底部是空的,是因為interpolate為1的緣故。
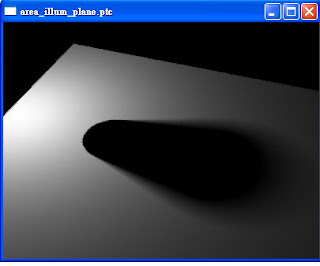
而area_illum_plane.ptc如下圖。右鍵->color->white,可以看到中間沒有空洞,整片白的plane。由上一個和此*.ptc可以看到,shadow的資訊被寫入*.ptc裡。
將ptc_gen.sl內容改成:
surface
    bake_illumsurfcolor(string filename = "", displaychannels = "", texturename = "";
                        float interpolate = 1)
    {
        color irrad, tex = 1, illumsurfcolor;
        normal Nn = normalize(N);

        /* Compute direct illumination (ambient and diffuse) */
        irrad = ambient() + diffuse(Nn);

        /* Multiply by surface color */
        if (texturename != "")
            tex = texture(texturename);
        illumsurfcolor = irrad * tex * Cs;

        /* Store in point cloud file */
        bake3d(filename, displaychannels, P, Nn, "interpolate", interpolate,
               "_illumsurfcolor", illumsurfcolor);

        Ci = illumsurfcolor * Os;
        Oi = Os;
    }
再將ptc_RIB.rib內容改成:
FrameBegin 0

      Format 400 300 1
      ShadingInterpolation "smooth"
      PixelSamples 4 4

      Display "bake_illumsurf" "it" "rgba"
      Quantize "rgba" 255 0 255 0.5
      DisplayChannel "color _illumsurfcolor"

      Projection "perspective" "fov" 25
      Translate 0 -0.5 8
      Rotate -40  1 0 0
      Rotate 20  0 1 0

      Attribute "trace" "bias" 0.0001

      WorldBegin

        Attribute "cull" "hidden" 0   # don't cull hidden surfaces
        Attribute "cull" "backfacing" 0   # don't cull backfacing surfaces
        Attribute "dice" "rasterorient" 0   # view-independent dicing !
        Attribute "visibility" "int diffuse" 1   # make objects visible to rays
        Attribute "visibility" "int specular" 1   # make objects visible to rays

        LightSource "spherelight" 1 "from" [-2.8 2 0.5] "radius" 0.2
          "intensity" 2 "samples" 64 "falloff" 1

        Sides 1   # to avoid flipping normals in "spherelight"

        # Ground plane
        AttributeBegin
          Surface "bake_illumsurfcolor" "filename" "illumsurf_plane.ptc"
            "displaychannels" "_illumsurfcolor" "texturename" "ooxx.tex"
          Scale 3 3 3
          Polygon "P" [ -1 0 1  1 0 1  1 0 -1  -1 0 -1 ]
          "s" [1 1 0 0]
          "t" [0 1 1 0]
        AttributeEnd

        Attribute "visibility" "int transmission" 1 # the cyl. casts shadow
        Attribute "shade" "transmissionhitmode" "primitive"

        # Cylinder with cap
        AttributeBegin
          Surface "bake_illumsurfcolor" "filename" "illumsurf_cyl.ptc"
            "displaychannels" "_illumsurfcolor" "texturename" "ooxx.tex"
          Translate -1 0 0.5
          Rotate -90 1 0 0
          Cylinder 0.5 1 0 -360   # reversed to get texture right side up
          Disk 1 0.5 360
        AttributeEnd

      WorldEnd
    FrameEnd
其中 'ooxx.tex' 是利用txmake 這個command(txmake ooxx.tif ooxx.tex),將一個ooxx.tif轉成ooxx.tex,也就是RenderMan的材質格式。
render後可得到下圖:
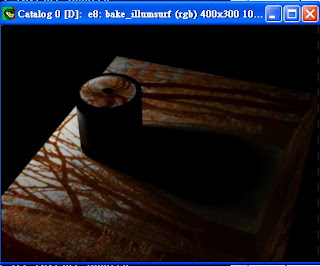
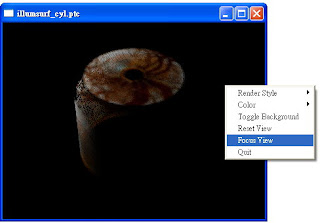
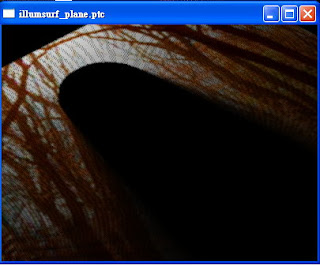
產生的*.ptc,分別為下面兩張圖(右鍵->Focus View可將視角focus在object上)。可以看到texture資訊也被寫入point裡。
最後介紹如何讀取已經bake好的ptc。
可以將已經bake好的ptc,當作是一種3-d的texture,可以用
texture3d() 來讀取。由上一個例子,將ptc_gen改成:
surface
    read_illumsurfcolor(uniform string filename = "")
    {
        color illumsurfcolor = 0;
        normal Nn = normalize(N);
        float ok;

     //利用texture3d(),將 _illumsurfcolor 的資訊寫入illumsurfcolor
        ok = texture3d(filename, P, Nn, "_illumsurfcolor", illumsurfcolor);

        Ci = illumsurfcolor * Os;
        Oi = Os;
    }
再將ptc_RIB.rib改成:(注意~這rib跟之前不同,沒有light shader,也不用指定*.tex,因為已經通通被寫入*.ptc裡,直接讀取*.ptc裡的資訊即可)
FrameBegin 0

      Format 400 300 1
      ShadingInterpolation "smooth"
      PixelSamples 4 4

      Display "read_illumsurf" "it" "rgba"
      Quantize "rgba" 255 0 255 0.5

      Projection "perspective" "fov" 25
      Translate 0 -0.5 8
      Rotate -40  1 0 0
      Rotate 20  0 1 0

      WorldBegin

        # Ground plane
        AttributeBegin
          Surface "read_illumsurfcolor" "filename" "illumsurf_plane.ptc"
          Scale 3 3 3
          Polygon "P" [ -1 0 1  1 0 1  1 0 -1  -1 0 -1 ]
        AttributeEnd

        # Cylinder with cap
        AttributeBegin
          Surface "read_illumsurfcolor" "filename" "illumsurf_cyl.ptc"
          Translate -1 0 0.5
          Rotate -90 1 0 0
          Cylinder 0.5 0 1 360
          Disk 1 0.5 360
        AttributeEnd

      WorldEnd
    FrameEnd
render後即可得到如前一例子的結果。
話說....這網誌已經閒置一個多月了,一來是不知道該寫些什麼,因為之前都在用RAT,而Pixar現在是推RMS;二來是前陣子事情也頗多的說~想想....還是寫些比較技術性的東西會覺得比較有趣~XD
朝下一個10篇邁進吧!(遠目~~~)